Massage Therapist Tulsa helps people relieve stress and muscle tension. The practice involves more than just touch. It requires knowledge of anatomy and proper techniques. A skilled therapist tailors the approach to each client’s needs.
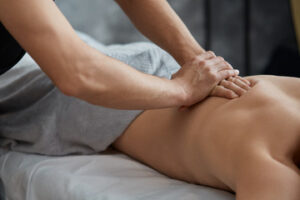
Massage therapy improves blood circulation and reduces muscle soreness. It helps release built-up tension in the body. Targeted pressure promotes relaxation and healing. Proper technique enhances muscle recovery and flexibility.
Therapists assess a client’s physical condition before starting. They identify problem areas and tension points. This ensures the treatment is safe and effective. Understanding a client’s health history guides the approach.
Different techniques are used based on the client’s needs. Deep tissue massage targets muscle knots and chronic pain. Swedish massage focuses on relaxation and overall wellness. Each technique serves a unique purpose.
Pressure application varies depending on the goal. Light pressure promotes relaxation and stress relief. Deep pressure targets muscle adhesions and stiffness. The therapist adjusts intensity based on feedback.
Massage therapy stimulates the lymphatic system. This helps flush out toxins and reduces inflammation. Improved lymph flow boosts immune response. The body’s natural healing process is enhanced.
Trigger point therapy targets specific muscle knots. Pressure is applied to release the tension. This reduces referred pain and improves mobility. Proper technique prevents muscle strain.
Stretching techniques improve flexibility and range of motion. Assisted stretches relax tight muscles. Increased mobility reduces the risk of injury. Flexible muscles enhance overall physical performance.
Sports massage benefits athletes and active individuals. It focuses on muscle recovery and performance enhancement. Pre-event massage warms up muscles and increases circulation. Post-event massage reduces soreness and improves recovery.
Massage therapy also supports mental well-being. Stress reduction promotes better sleep quality. Lower stress levels enhance mood and emotional balance. A relaxed mind supports overall health.
Aromatherapy enhances the massage experience. Essential oils calm the nervous system. Specific scents promote relaxation or alertness. The right aroma enhances the overall effect.
Hot stone therapy uses heated stones to relax muscles. The warmth increases blood flow and eases tension. Combined with manual pressure, it enhances relaxation. Heat penetrates deep into muscle tissue.
Prenatal massage supports expecting mothers. It reduces back pain and swelling. Gentle techniques ensure comfort and safety. Proper positioning protects both the mother and baby.
Reflexology targets pressure points in the hands and feet. Each point corresponds to an organ or system. Stimulating these points promotes balance and healing. Reflexology enhances overall body function.
Cupping therapy uses suction to increase blood flow. It reduces muscle stiffness and pain. The suction creates a deep tissue release effect. Proper technique prevents bruising and discomfort.
Massage therapy aids in post-surgical recovery. It reduces swelling and scar tissue formation. Gentle techniques improve circulation and mobility. Proper care supports faster healing.
Chronic pain management benefits from regular massage. It relieves muscle tension and nerve compression. Relaxed muscles reduce the pain cycle. Improved circulation enhances tissue repair.
Massage therapy supports injury rehabilitation. It restores muscle balance and flexibility. Trigger point release reduces discomfort. Enhanced mobility speeds up the recovery process.
Myofascial release targets connective tissue tension. Gentle pressure stretches and loosens fascia. This improves muscle function and reduces stiffness. Proper technique prevents tissue damage.
Lymphatic drainage massage improves fluid balance. Gentle strokes stimulate lymph flow. Reduced swelling improves comfort and mobility. Proper technique enhances immune response.
Massage therapy reduces headaches and migraines. Neck and shoulder tension often contribute to headaches. Targeted pressure releases muscle knots. Improved circulation reduces headache frequency.
Craniosacral therapy focuses on the head and spine. Light touch releases tension in the nervous system. This improves overall body balance and function. Proper alignment reduces discomfort.
Massage enhances sleep quality and relaxation. Lower cortisol levels promote deep rest. Relaxed muscles reduce nighttime discomfort. Better sleep improves overall health and energy levels.
Massage therapy supports digestive health. Abdominal massage stimulates gut motility. Improved circulation aids nutrient absorption. Reduced tension improves digestive function.
Facial massage improves skin tone and circulation. Gentle strokes enhance lymphatic drainage. Reduced tension softens facial muscles. Improved circulation promotes a healthy glow.
Massage therapy also improves posture. Muscle tension often causes misalignment. Releasing tight muscles restores natural alignment. Proper posture reduces strain on the spine.
Massage therapy benefits people with anxiety and depression. It lowers cortisol and increases serotonin levels. Improved mood enhances emotional balance. Relaxed muscles reduce mental tension.
Therapists use specialized equipment to enhance treatments. Heated tables improve muscle relaxation. Ergonomic supports ensure client comfort. Proper equipment enhances the overall experience.
Communication between therapist and client is crucial. Clients should express comfort levels and preferences. Feedback ensures proper pressure and technique. Open communication enhances treatment effectiveness.
Massage therapy benefits people of all ages. Children and elderly clients respond well to gentle techniques. Proper care ensures comfort and safety. Customized approaches meet individual needs.
Massage therapy supports athletes during training. Regular sessions improve muscle recovery. Reduced stiffness enhances flexibility and strength. Enhanced performance results from proper muscle care.
Massage therapy is beneficial for people with mobility issues. Gentle stretching improves range of motion. Reduced muscle tension increases comfort. Enhanced flexibility supports better movement.
Massage therapy boosts immune function. Reduced stress supports better immune response. Improved circulation enhances white blood cell activity. A strong immune system supports overall health.
Massage therapy relieves tension from prolonged sitting. Desk jobs create muscle imbalances and stiffness. Targeted massage releases hip and back tension. Improved posture enhances comfort and focus.
Massage therapy enhances circulation to extremities. Poor circulation leads to numbness and coldness. Increased blood flow improves warmth and comfort. Enhanced oxygen delivery supports muscle health.
Massage therapy also aids in detoxification. Improved lymph flow removes waste products. Reduced inflammation enhances tissue health. Proper hydration enhances the detox process.
Massage therapy supports emotional healing. Physical touch increases oxytocin levels. Increased oxytocin promotes trust and relaxation. Emotional balance improves overall well-being.
Massage therapy benefits people with chronic illnesses. Reduced muscle tension eases discomfort. Improved circulation supports tissue repair. Emotional relief enhances coping ability.
Massage therapy also supports respiratory health. Chest and back massage improve lung function. Reduced tension enhances breathing capacity. Proper technique increases relaxation and airflow.
Massage therapy enhances focus and concentration. Lower stress levels improve mental clarity. Relaxed muscles reduce distraction and discomfort. Improved focus enhances daily performance.
Massage therapy reduces inflammation from overuse. Muscle recovery improves with increased circulation. Reduced swelling enhances comfort and movement. Proper care prevents injury recurrence.
Massage therapy supports emotional release. Stored tension often holds emotional stress. Releasing muscle knots promotes mental clarity. Emotional balance enhances physical health.
Massage therapy improves joint health. Increased synovial fluid flow enhances lubrication. Reduced muscle tension supports joint alignment. Improved mobility reduces joint discomfort.
Massage therapy enhances sensory awareness. Increased touch sensitivity improves muscle response. Relaxed muscles improve coordination and balance. Enhanced awareness supports better movement.
Massage therapy supports neurological health. Improved circulation enhances nerve function. Reduced muscle tension improves nerve response. Proper care supports sensory and motor function.
Massage therapy enhances the mind-body connection. Relaxed muscles improve emotional balance. Enhanced circulation supports mental clarity. Proper care enhances overall well-being.
Massage therapy is a powerful tool for healing. Proper techniques enhance both physical and mental health. Skilled application ensures safety and effectiveness. A well-trained therapist enhances the overall experience.